Dental enhancements have become the go-to solution for replacing absent teeth, thanks to be able to their natural search, long-term durability, and even ability to recover both function and even confidence. But as opposed to a routine gas or crown, augmentations involve an organized, multi-phase process of which does take time, planning, and aftercare. If you’re considering dental implants in Toronto, that helps to know exactly exactly what to expect by your first assessment all the approach through long-term servicing.
This guide walks you step-by-step from the implant journey — breaking down timelines, procedures, costs, and even aftercare so you feel fully prepared.
Step 1: Preliminary Consultation and Examination
Your implant trip in Toronto begins with an exhaustive consultation. During my review here , the dental practitioner or implant consultant will:
Take a look at common and health background (conditions like diabetes, smoking, or certain medications may affect healing).
Perform an in depth oral exam to assess gum health, mouth alignment, and virtually any remaining teeth.
Order digital X-rays or perhaps a 3D CBCT check out to evaluate cuboid density and structure.
Discuss your objectives, treatment options (implants, bridges, or dentures), and answer the questions.
At this stage, you’ll also obtain a personalized treatment plan detailing the number associated with implants needed, whether grafting is required, timelines, and estimated costs.
Tip: Look for the itemized quote and even clarification on what’s included — a few clinics bundle charges, while others list them separately.
Step 2: Treatment Planning plus Preparatory Procedures
Before the implant can be placed, your mouth demands to be found in optimal health. This kind of may involve basic work for example:
Tooth extractions: When a broken or failing the teeth needs to end up being removed, it’s frequently extracted first. Sometimes, implants can become placed immediately right after extraction if bone fragments quality is very good.
Bone grafting: In the event that the jawbone large thin or weakened, a graft is performed to build up the bone. This specific can add 3–6 months of healing time before implant placement.
Sinus elevate: For upper chin implants near the molars, the nose floor may need to be brought up and grafted with regard to proper support.
These kinds of preparatory steps guarantee the implant will have a strong, steady foundation.
Step 3 or more: Implant Placement Surgery
Once the groundwork is ready, typically the implant placement is performed as an outpatient procedure, usually underneath local anesthesia (though sedation is offered in many Toronto clinics for stressed patients).
The procedure involves:
Making a new small incision found in the gum.
Going a precise place inside the jawbone using guided technology.
Applying the titanium or perhaps zirconia implant write-up.
Closing the gum tissue over the implant with appears.
The surgery commonly takes 1–2 hrs per implant. Numerous patients return to work within a day or a couple of, although mild swelling and soreness are expected stay.
Action 4: Healing and Osseointegration
After surgical procedure, the most important phase begins: osseointegration, where the pelisse fuses with typically the jawbone. This approach usually takes 3–6 months, though it could vary depending in bone health and individual healing.
Throughout this time:
The particular implant becomes secure enough to assistance chewing forces.
A person may wear a brief crown, bridge, or perhaps denture to fill the gap and look after aesthetics.
You’ll enroll in follow-up visits in Toronto to keep track of healing and guarantee there are simply no complications.
Tip: Avoid smoking during this kind of phase, as it significantly reduces implant success rates.
Step five: Abutment Placement
Once osseointegration is total, a second minor procedure is carried out to attach the particular abutment — a small connector piece that will links the turfiste to the last crown.
The gum is reopened, typically the abutment is secured, plus the gum tissues is allowed to be able to heal around this for 2–3 weeks. This healing ensures a natural periodontal contour around the particular future crown.
Stage 6: Custom Crown or Prosthesis
Typically the final stage consists of crafting and placing the prosthetic tooth (or teeth). This might be:
Just one crown for one pelisse.
An implant-supported passage for multiple lacking teeth.
A full-arch prosthesis (All-on-4 or All-on-6) for sufferers replacing all the teeth.
The dentist will need digital impressions in addition to work with the lab to create a crown that matches colour, shape, and scale your natural the teeth. Once placed, typically the implant restoration should look and performance just like a real dental.
Step seven: Immediate vs. Traditional Loading
Inside some Toronto centers, same-day implants or “teeth within a day” options are obtainable, where a short-term prosthesis is located immediately after surgery. However, this strategy isn’t suitable intended for everyone. Traditional loading (waiting many months regarding osseointegration) generally gives the highest extensive success rates.
Action 8: Aftercare and even Healing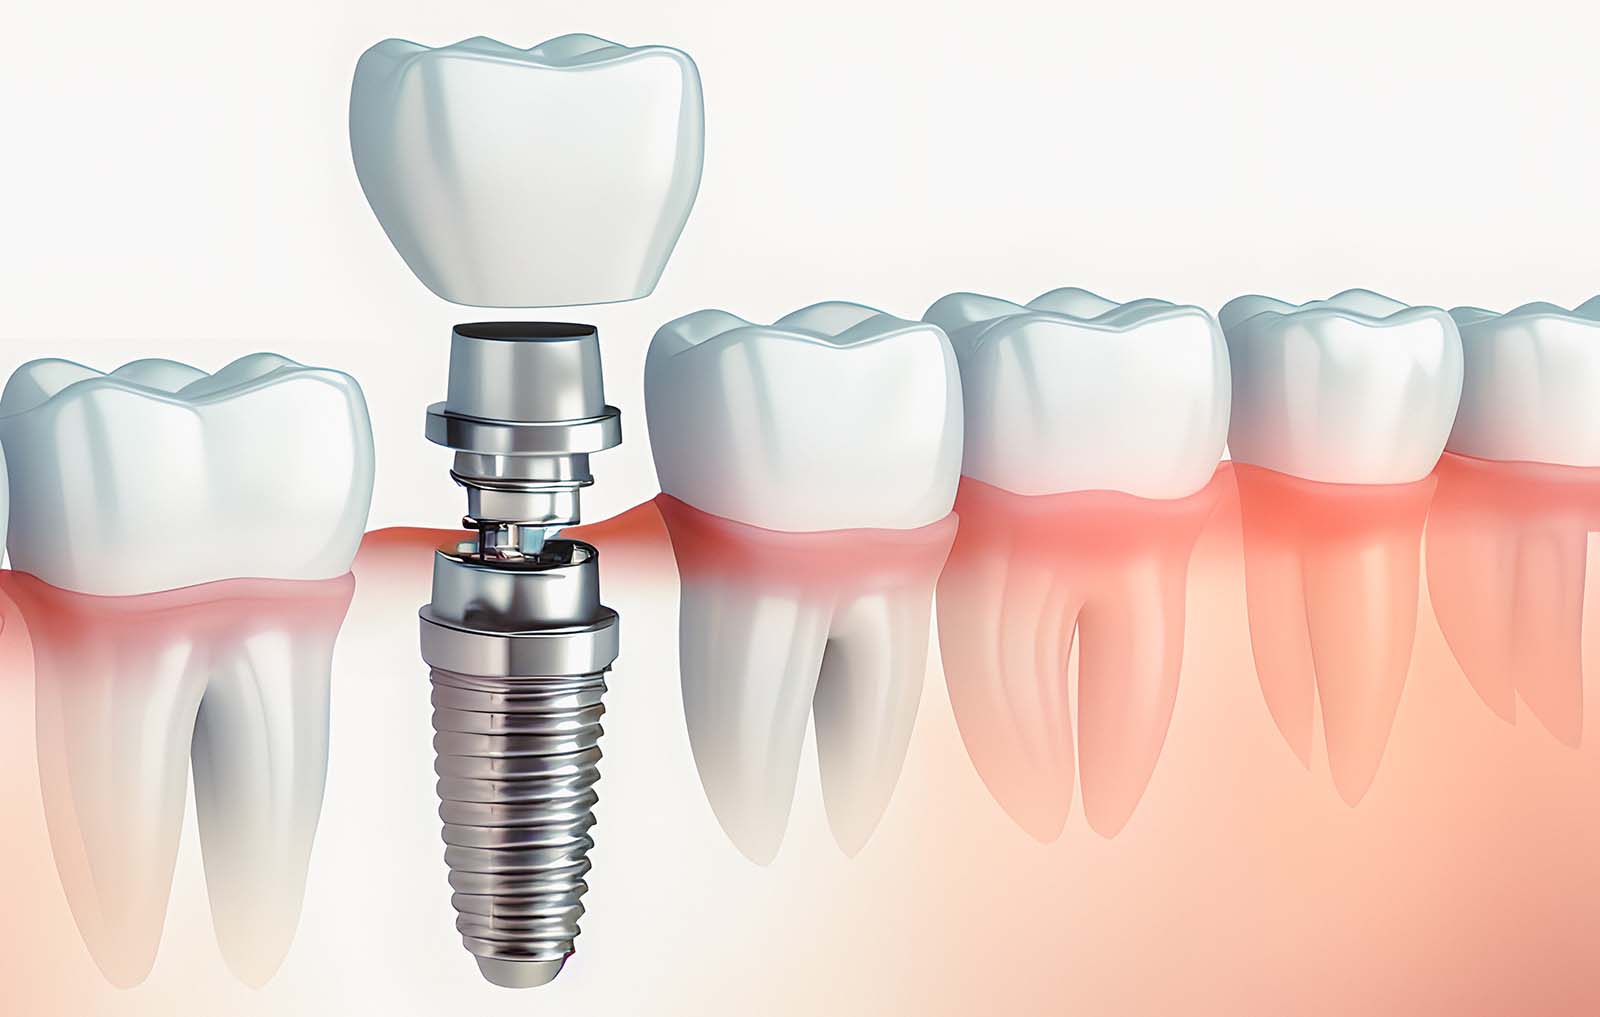
After surgery and restoration, suitable aftercare is crucial:
First few days: Stick to gentle foods, use cool packs for puffiness, and take prescribed medications.
First two weeks: Maintain exceptional oral hygiene (gentle brushing and antiseptic rinses) while staying away from heavy chewing on the implant site.
Ongoing: Attend girl visits for specialist cleaning and watching.
Signs of complications include persistent pain, swelling, or loosening from the implant — in which case you should get in touch with your Toronto dental practitioner immediately.
Step 9: Long-Term Upkeep
Dental implants may last 20+ years with proper care. To maximize longevity:
Brush and floss daily, paying out extra attention round the implant crown.
Make use of interdental brushes or even water flossers with regard to thorough cleaning.
Timetable regular professional cleanings and checkups (usually every 6 months).
Avoid smoking and uncontrolled gum illness, both of which may cause implant disappointment.
Unlike dentures, augmentations don’t require removing, and unlike bridges, they don’t need to have special flossing supports under a false tooth — servicing is very similar to natural the teeth.
Timeline Recap
Consultation & planning: 1–2 visits.
Preparatory do the job (if needed): 3–6 months healing.
Pèlerine surgery: 1–2 hours.
Healing/osseointegration: 3–6 weeks.
Abutment placement: 2–3 weeks healing.
Last crown/prosthesis: 1–2 appointments.
Overall, the trip can take anywhere from 4 months (in simple cases) to be able to 12 months or perhaps more for complicated cases with grafting.
Costs in Barcelone
On average:
Single implant: CAD $3, 000–$6, 000.
Implant-supported bridge: CAD $6, 000–$12, 000.
Full-arch implants: CAD $20, 000–$35, 000+.
These figures depend upon the clinic, pelisse system, and regardless of whether preparatory surgeries usually are needed. OHIP will not cover teeth implants, but many private insurance blueprints may cover the particular crown portion. Several Toronto clinics offer up financing and regular monthly payment options for making implants more obtainable.
Final Thoughts
Getting dental implants in Toronto is just not an one-day event but a structured journey concerning planning, surgery, treatment, and long-term care. While the schedule is longer when compared with dentures or connections, the payoff may be worth it: a steady, natural-looking solution of which can last many years and dramatically enhance quality of living.
By understanding the particular step-by-step process, patients can enter therapy with realistic objectives and confidence. In case you’re considering enhancements, schedule a session with a trusted Toronto implant specialist — and begin your current journey toward a healthier, more comfortable smile.